TLS Tunnel
A TLS tunnel, also known as an SSL tunnel, is a secure channel that allows data to travel between two endpoints while being encrypted and protected from eavesdropping and tampering. This form of tunneling relies on the TLS protocol to establish an encrypted connection between a client and a server, ensuring that the data exchanged between them remains confidential and secure.

TLS tunneling provides end-to-end encryption which is essential for maintaining the confidentiality and integrity of data transmitted over the internet. This ensures that sensitive information remains shielded from prying eyes and malicious eavesdroppers including internet service providers, and allowing users to communicate and exchange data with a high level of trust.
In this blog, we’ll learn how TLS tunnels work and explore how to utilize Pinggy, a popular developer tool, to create secure and seamless TLS tunnel to localhost.
What is TLS
Transport Layer Security (TLS) and its precursor, Secure Sockets Layer (SSL), constitute pivotal milestones in secure communication protocols. SSL, introduced by Netscape Communications in the early 1990s was followed by TLS 1.0 introduced in 1999. The TLS protocol operates in the transport layer. TLS over TCP starts with a handshake process. The client and server engage in a series of steps to agree upon encryption algorithms, exchange digital certificates, and generate session keys (typically symmetric keys). Subsequent data transmission is encrypted using these session keys, ensuring that the exchanged information remains confidential and resistant to eavesdropping or tampering. You can read more about TLS here.
TLS handshake

At a very high level overview, the TLS handshake process involves a series of carefully orchestrated steps that establish a secure and encrypted channel between the client and server. This ensures the confidentiality, integrity, and authenticity of the data exchanged during the communication.
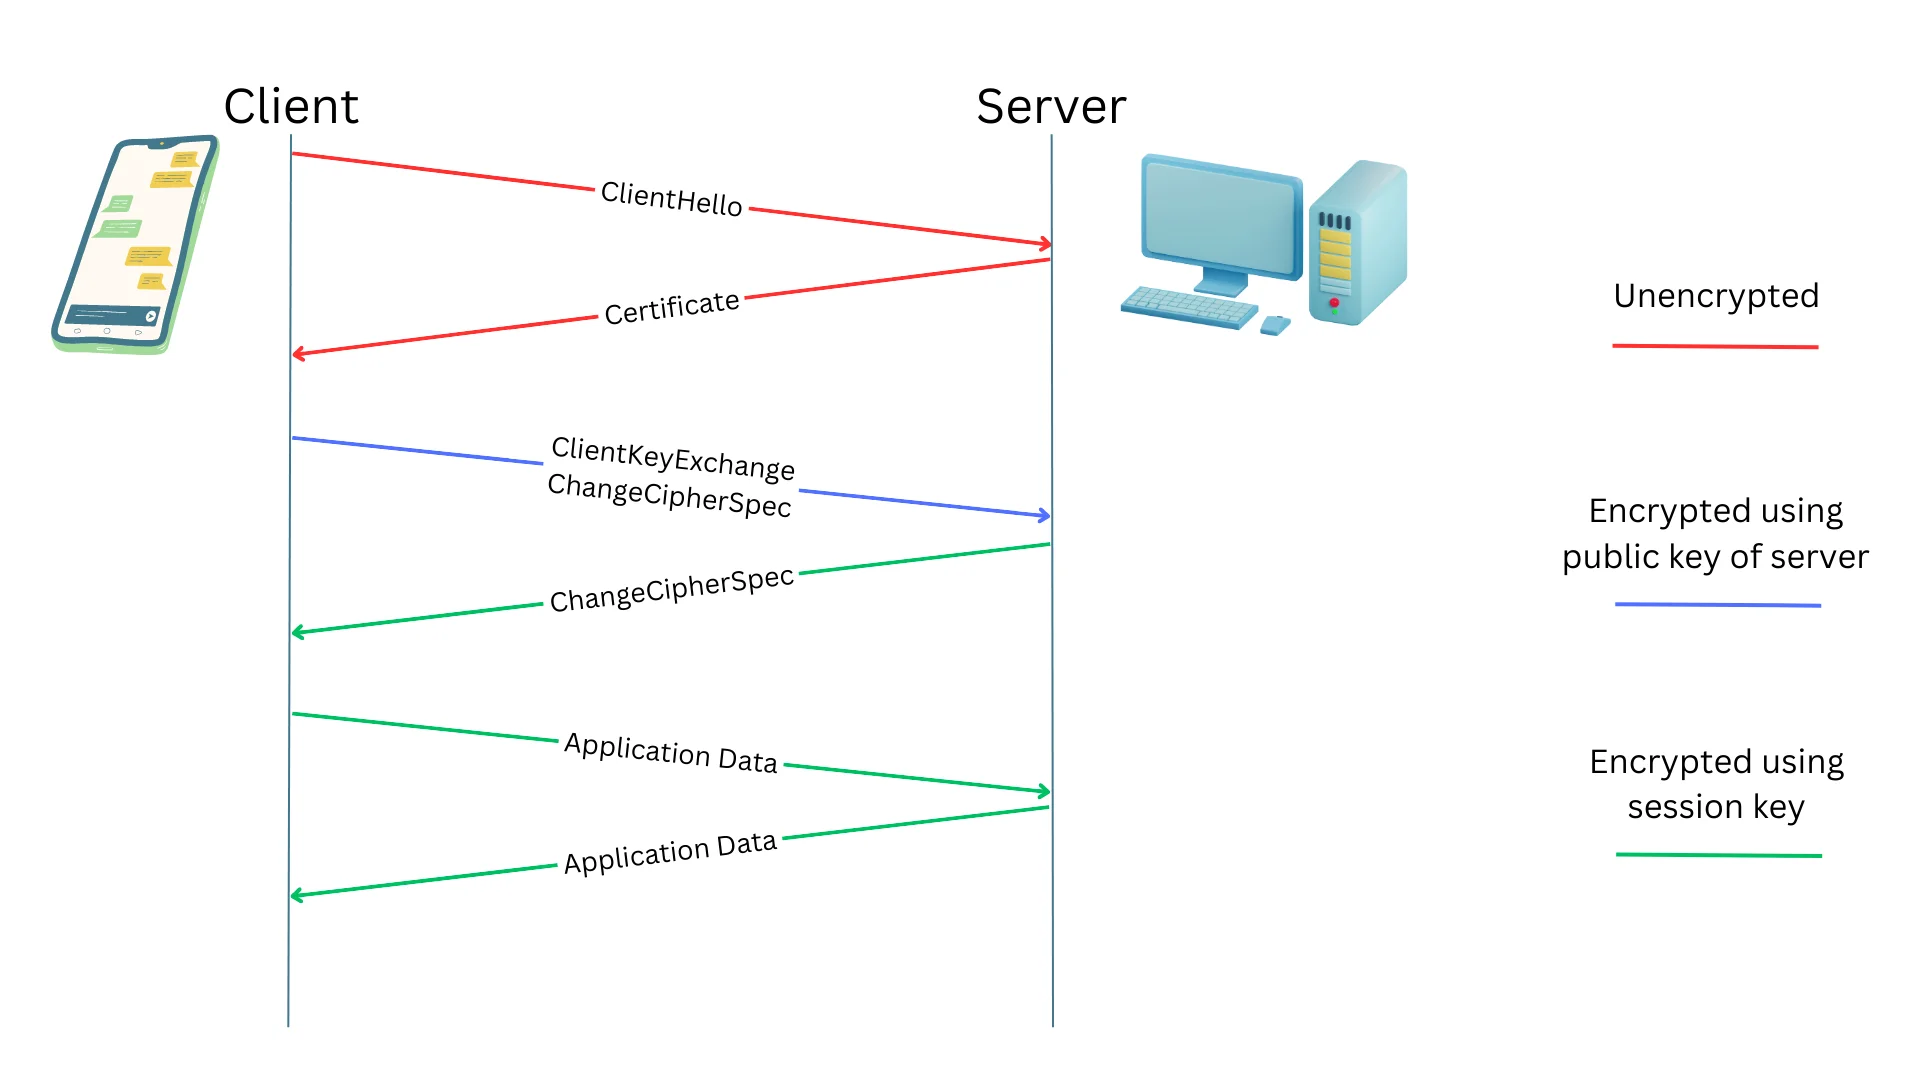
Here are key phases in this process. Each message is carried through the transport layer protocols such as TCP.
-
ClientHello: The ClientHello message is sent by the client to initiate the TLS handshake, indicating supported encryption methods and preferences.
-
Certificate: In response, the server sends its digital certificate to the client, verifying its identity and enabling the client to establish a secure connection.
-
ClientKeyExchange: The client generates a pre-master secret and encrypts it using the server’s public key, facilitating the exchange of secret keys required for encryption.
-
ChangeCipherSpec: Both parties exchange ChangeCipherSpec messages to signal the transition to encrypted communication, making the negotiated encryption algorithms active.
-
ApplicationData: After the handshake is completed, encrypted ApplicationData messages are exchanged, containing the actual data being transmitted securely between the client and server.
To learn about TLS in more detail, please consult the RFC.
What is a TLS Tunnel
In networking, a tunnel refers to a method of encapsulating one type of network traffic within another type of network protocol. A TLS tunnel therefore refers to a tunnel where the network traffic is encrypted by the TLS protocol.
A tunnel is often used to establish connectivity around NATs and firewalls. For example, your home network might not have a public IP address and your router might be having a NAT behind which your devices are located. In such cases, we can utilize a tunnel to enable remote access to devices within your private network, allowing you to securely access resources from outside your local network.
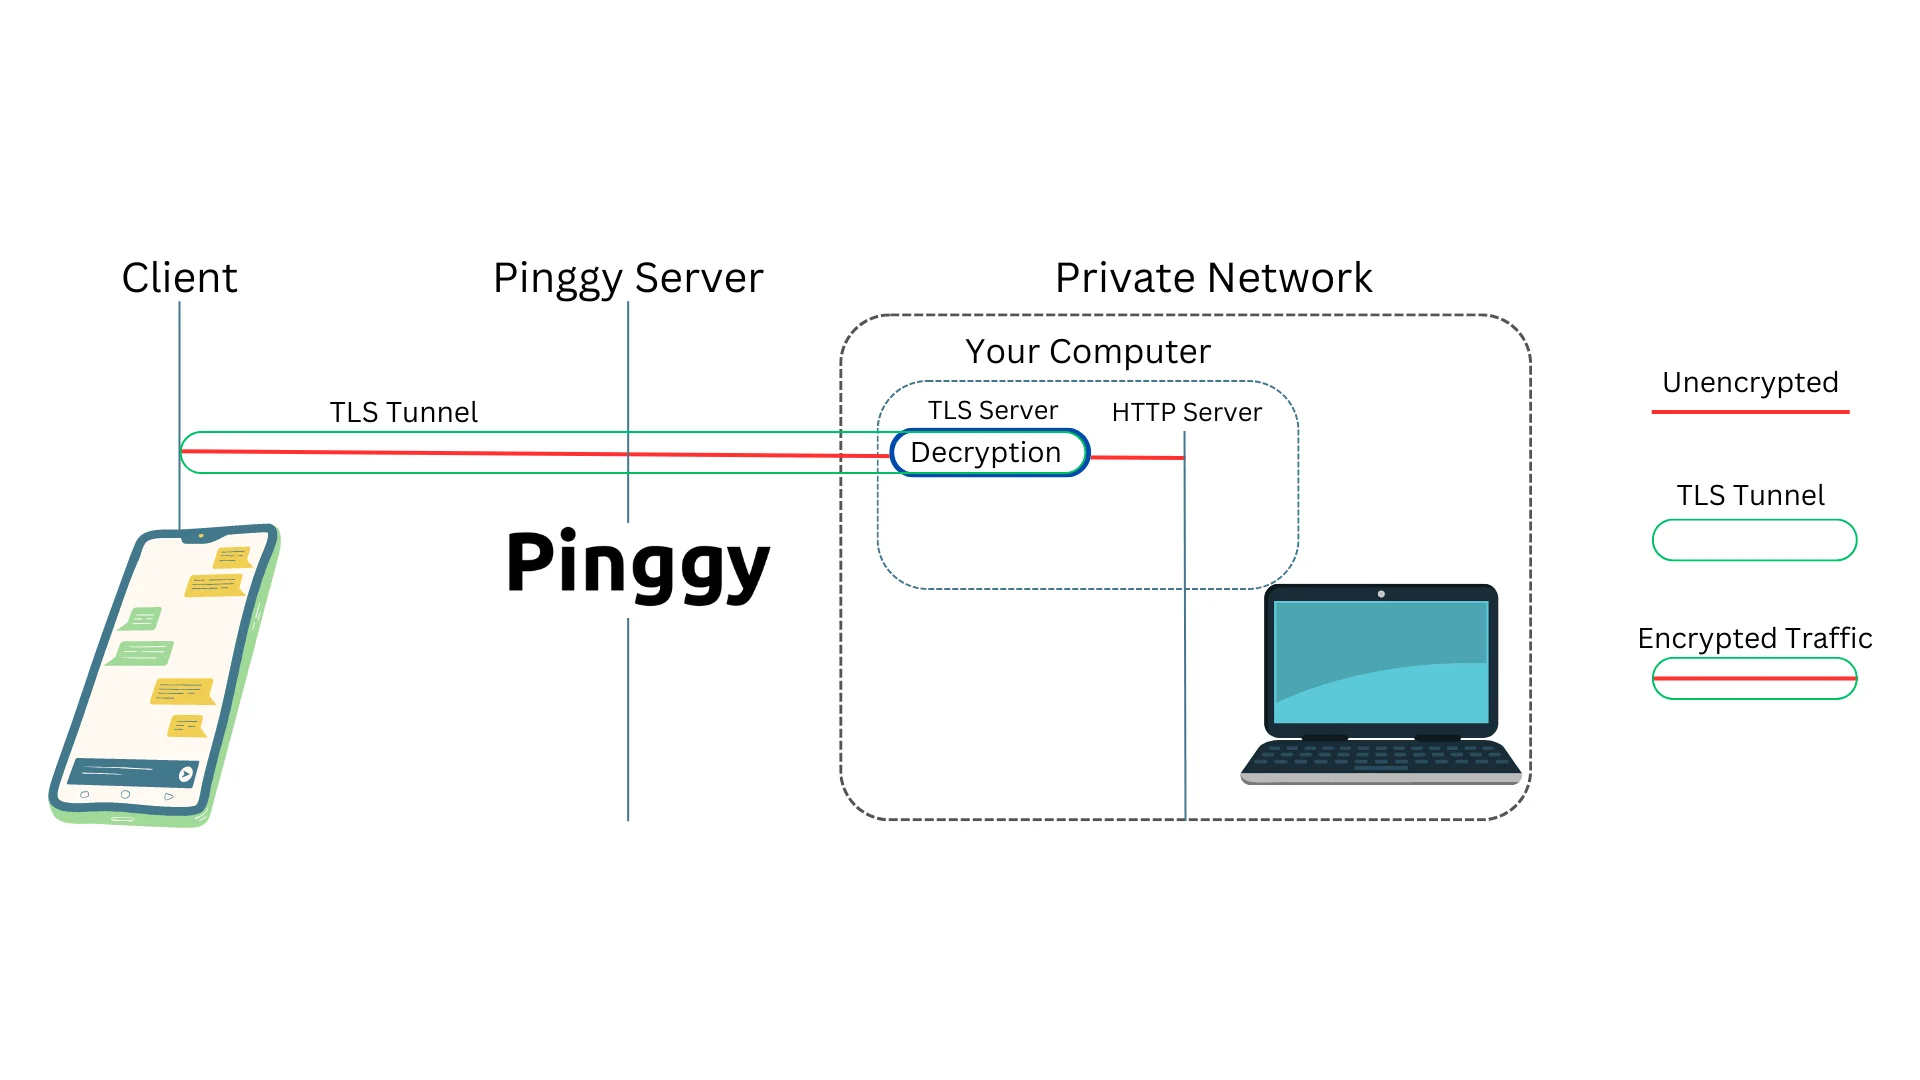
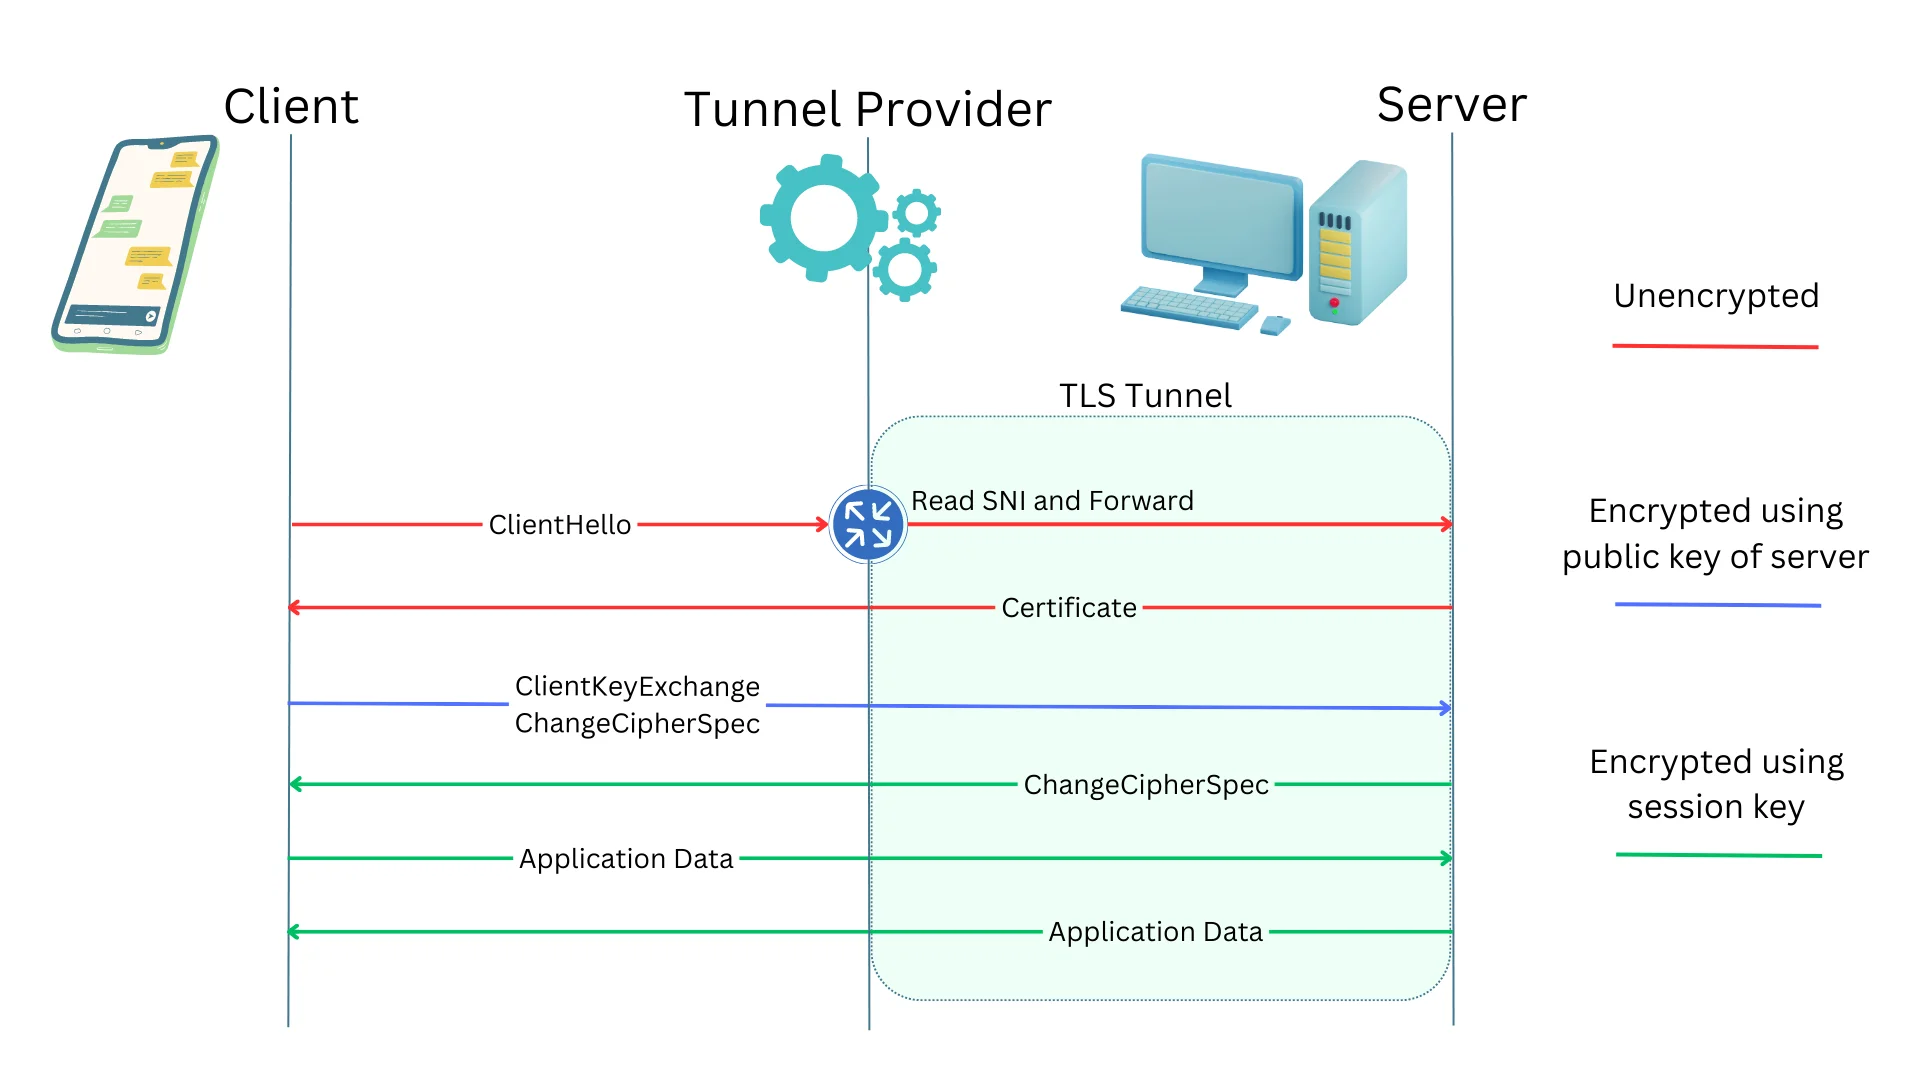
End-to-end encryption: A TLS tunnel is however different from other types of tunneling. Most importantly, TLS tunnels are end-to-end encrypted. The end-users client and the server negotiate a session key using which all the traffic is encrypted. Therefore, no other party including the tunnel provider, or the ISPs can eavesdrop on the traffic through such a tunnel.
In tunnel service providers such as Pinggy or Ngrok, the TLS tunnel traffic is terminated at the application servers, not at the tunnel providers’ servers.
Prerequisite for TLS tunnels: The end server, such as an HTTPS server, must possess the required TLS key and certificate to handle traffic termination for the specific domain or subdomain used to establish the tunnel. For instance, if the tunnel is accessed via the domain tls.tunnel.com, the server to which the tunnel is directed must be equipped with the relevant domain certificate to effectively terminate the TLS connections.

How TLS tunnels work?: TLS tunnels depend on the Server Name Indication (SNI). SNI is an extension in the TLS protocol that contains the hostname or domain name requested by the client. This information is sent as part of the initial TLS handshake to the server, allowing the tunnel server to determine which tunnel to forward the traffic to. SNI is contained in the ClientHello message. Apart from this ClientHello message, none of the encrypted messages that follow can be decrypted by the tunnel provider.
How to create a TLS Tunnel for free
To create a TLS tunnel that forwards traffic to a local HTTPS server running on port 443, just paste the following command on your terminal in Mac / Windows / Linux.
ssh -p 443 -R0:localhost:443 tls@a.pinggy.io
You can customize the command here:
Note that your HTTPS server must have the certificates to terminate the TLS tunnel. To associate your custom domain with the tunnel, just Sign in to Pinggy and get a custom domain.
Step 1 - open terminal
For Mac:
Open the Terminal application. You can find it in the Applications > Utilities folder.
Or use Spotlight search by pressing Command + Space and typing Terminal.
For Windows:
Open the Command Prompt or PowerShell application. Press the Windows key, type cmd or powershell and press Enter.
For Linux:
Open the terminal. You can usually find it in the Applications menu or by using the keyboard shortcut Ctrl + Alt + T.
Step 2 - paste the TLS tunnel command
Copy the provided command:
ssh -p 443 -R0:localhost:443 tls@a.pinggy.io
Paste the command into the terminal and press Enter.
If prompted, enter blank password and press enter.
Step 3 - Using the tunnel
By following these steps, you will create a TLS tunnel and the command will output a public URL such as ran-atX986aa.a.pinggy.online. You can access your localhost HTTPS server using this public URL.
Step 4 - Configuring domain and certificates
In order to make your HTTPS server handle the TLS connections successfully, you need to configure the certificates for your domain.
First get a free trial or subscribe to Pinggy Pro. Then associate your domain to Pinggy tunnel by signing in to Pinggy dashboard.
Then you can use Let's Encrypt to get a certificate.
Follow these steps if you want to configure Nginx with Let’s Encrypt:
-
Install Nginx: First, install Nginx on your server using your distribution’s package manager (e.g., apt for Ubuntu, yum for CentOS).
-
Install Certbot: Install Certbot, the Let’s Encrypt client, to manage SSL certificates. Use appropriate commands based on your operating system (e.g.,
apt install certbotfor Ubuntu,yum install certbotfor CentOS). -
Configure Nginx: Create an Nginx server block (virtual host) configuration for your website. Define the server’s domain name, root directory, and other settings.
-
Obtain and Install SSL Certificate: Run Certbot to obtain and install the SSL certificate. Use the
certbotcommand followed by--nginxflag to automatically configure Nginx to use the certificate and enable HTTPS.
Consult the Let's Encrypt documentation for detailed instructions.
After completing these steps, Nginx will be properly configured with a Let’s Encrypt SSL certificate, ensuring secure and encrypted communication for your website visitors.